Setting up JMX monitoring with Zabbix for Tomcat
Setting up JMX monitoring of Tomcat or a standalone application can become a bit confusing. It has lots of little caveats. This blog addresses that.

I tried to set up JMX monitoring for a couple of Tomcat servers and it took a lot of time than it needed to. So this blog simplifies that process.
The environment I set it up was a trusted network (VPC in AWS) so I did not bother with the security part since everything is restricted using security groups.
Some explanation
I shall try and explain some concepts more clearer than the documentation and relating to my environment
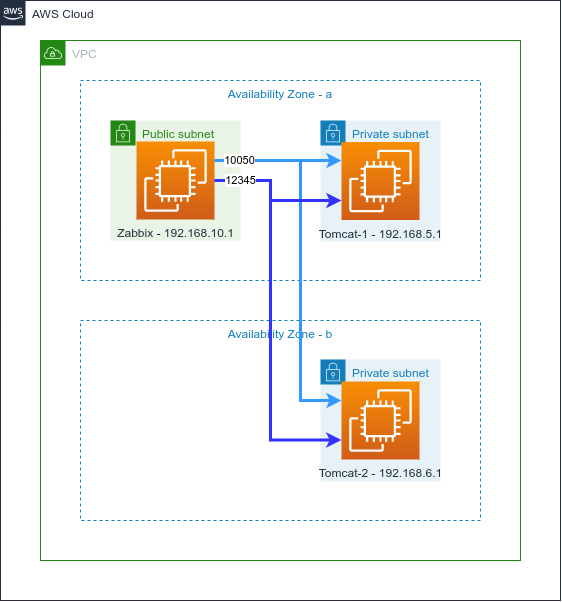
Infra diagram

Zabbix Java Gateway
The Zabbix Java gateway is basically like a Zabbix proxy server but unlike a normal Zabbix proxy server which cannot be nested i.e you cannot set one proxy server behind another proxy server, you can set a Zabbix Java gateway behind a proxy or directly connecting to the Zabbix server.
There is also another difference compared to a Zabbix proxy. You can add multiple Zabbix proxies with the Zabbix server UI, but there can be only one Zabbix Java gateway and it has to be configured in /etc/zabbix/zabbix_server.conf (or /usr/local/etc/zabbix_server.conf) or wherever your Zabbix server configuration is.
Setting up JMX monitoring
Zabbix Java gateway setup
The following was my configuration after I installed the Zabbix Java gateway in the Zabbix server.
Make sure that you start the Zabbix Java gateway service.
JavaGateway=127.0.0.1
JavaGatewayPort=10052
StartJavaPollers=5
Restart the Zabbix server service after updating with the above configuration
Make sure that any internal firewall or security group has the access enabled for 12345 port to the Tomcat server
Tomcat setup
To make tomcat start listening on 12345 port for the jmx connections, add the following options to it.
java.rmi.server.hostname=xxx.xxx.xxx.xxx
com.sun.management.jmxremote.rmi.port=12345
com.sun.management.jmxremote
com.sun.management.jmxremote.port=12345
com.sun.management.jmxremote.authenticate=false
com.sun.management.jmxremote.ssl=false
com.sun.management.jmxremote.registry.ssl=false
So in this case, the Tomcat 1 (192.168.5.1) server will have the following entry in /etc/systemd/system/tomcat.service
[Unit]
Description=Apache Tomcat Web Application Container
After=syslog.target network.target

[Service]
Type=forking

Environment=UMASK=022
Environment=JAVA_HOME=/usr/lib/jvm/jre
Environment=CATALINA_PID=/usr/share/tomcat8/temp/tomcat.pid
Environment=CATALINA_HOME=/usr/share/tomcat8
Environment=CATALINA_BASE=/usr/share/tomcat8
Environment='CATALINA_OPTS=-Xms512M -Xmx3072M -Xss2M -server -XX:+UseParallelGC'
Environment='JAVA_OPTS=-Djava.awt.headless=true -Djava.security.egd=file:/dev/./urandom -Djava.rmi.server.hostname=192.168.5.1 -Dcom.sun.management.jmxremote.rmi.port=12345 -Dcom.sun.management.jmxremote -Dcom.sun.management.jmxremote.port=12345 -Dcom.sun.management.jmxremote.authenticate=false -Dcom.sun.management.jmxremote.ssl=false -Dcom.sun.management.jmxremote.registry.ssl=false'

ExecStart=/usr/share/tomcat8/bin/startup.sh
ExecStop=/bin/kill -15 $MAINPID

User=root
Group=tomcat

[Install]
WantedBy=multi-user.target
and Tomcat 2 (192.168.6.1) will have the following entry in the tomcat service file
[Unit]
Description=Apache Tomcat Web Application Container
After=syslog.target network.target

[Service]
Type=forking

Environment=UMASK=022
Environment=JAVA_HOME=/usr/lib/jvm/jre
Environment=CATALINA_PID=/usr/share/tomcat8/temp/tomcat.pid
Environment=CATALINA_HOME=/usr/share/tomcat8
Environment=CATALINA_BASE=/usr/share/tomcat8
Environment='CATALINA_OPTS=-Xms512M -Xmx3072M -Xss2M -server -XX:+UseParallelGC'
Environment='JAVA_OPTS=-Djava.awt.headless=true -Djava.security.egd=file:/dev/./urandom -Djava.rmi.server.hostname=192.168.6.1 -Dcom.sun.management.jmxremote.rmi.port=12345 -Dcom.sun.management.jmxremote -Dcom.sun.management.jmxremote.port=12345 -Dcom.sun.management.jmxremote.authenticate=false -Dcom.sun.management.jmxremote.ssl=false -Dcom.sun.management.jmxremote.registry.ssl=false'

ExecStart=/usr/share/tomcat8/bin/startup.sh
ExecStop=/bin/kill -15 $MAINPID

User=root
Group=tomcat

[Install]
WantedBy=multi-user.target
As you can see, the java.rmi.server.hostname option is configured with the Tomcat server's own IP address to which the Zabbix server connects to.
I have put ssl and other authentication and security options to false because this is inside a VPC and we have other layers of security in place.
After setting the above configuration in the service file, make sure to restart tomcat with the following commands
sudo systemctl daemon-reload
sudo systemctl restart tomcat.service
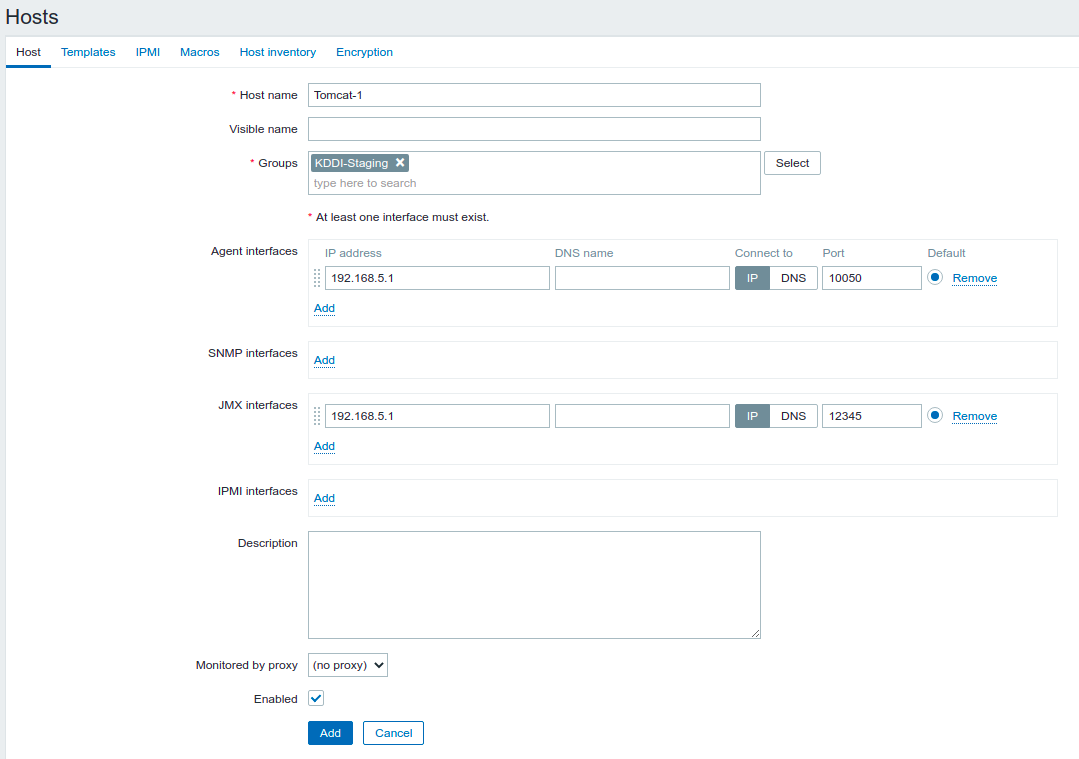
Zabbix Server UI config
This section tell you what you have to do in the Zabbix server UI side to configure the Tomcat servers as hosts for monitoring
In this case, it is just like configuring any other Zabbix agent host, but you have to enter the IP 192.168.5.1 (for Tomcat-1) and the port 12345 in the JMX interfaces section

If your configuration were correct, you should see the green JMX indicator

Some problems I faced
SSL error
SSL peer shut down incorrectly: service:jmx:rmi:///jndi/rmi://192.168.5.1:12345/jmxrmiI got the above error and I fixed it with the help from this answer. This is there in the systemd service file example I have put above.
This showed up as a red JMX indicator with the above error.
Wrong understanding
I thought this was like Zabbix agent itself where we install an agent on all the servers that we have to monitor, but it is not like that. We install Zabbix Java gateway in a single place that can access the JMX port on all the servers we want to monitor.
So we can install the gateway on the Zabbix server itself and when we use 12345 as the JMX port, we can open the firewall from Zabbix agent to the Tomcat server for 12345 port.
Since the Zabbix Java gateway agent listening on port 10052 is inside the Zabbix server itself, it doesn't need to be enabled in the firewall for external access.

